react 기초
한주동안 딥러닝을 다시 공부한다고 웹을 못만졌다.
밀린 숙제같은 기분을 안고 조금이나마 진전을 이뤄보려고 한다.
여태껏 완료한 것들으로는,
node, express, mongo db, react 설치로 스택 기본 준비를 한것과
mongo db atlas?를 이용하여 DB 서버와의 연결,
그리고 express를 이용해서 aws서버에서 오픈한 아이피로의 라우팅이 있다.
일단 구조를 따라 적으며, 어떠한 매커니즘으로 동작하는지만 알 수 있다면 응용은 쉽게 쉽게 document를 보며 작성할 수 있을 듯 싶었다.
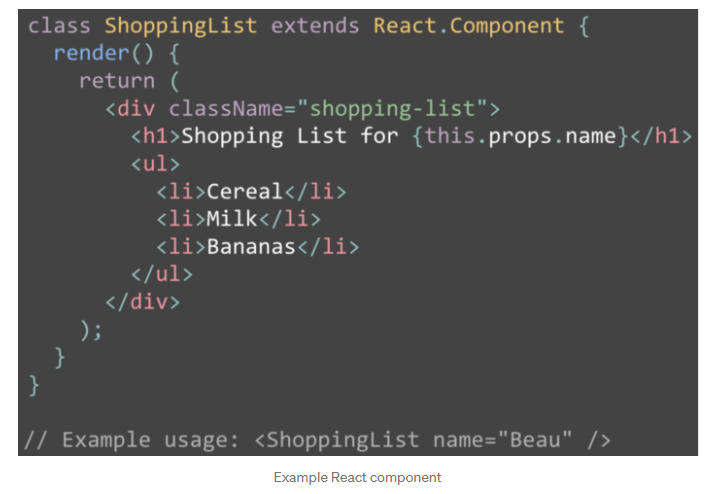
react는 user interface를 build 하기위해 만들어진 자바스크립트 라이브러리이다.
항상보면 사람들이 엄청 react react 하는거 같아서 써보기로 하는거다.
어쩄든 위와 같은 클래스에서 호출된 properties를 component가 가져가 render method를 통해 보이게끔 리턴시켜준다고 한다.
일단은 모르겠지만 하다보면 알 것이다. 계속하자.
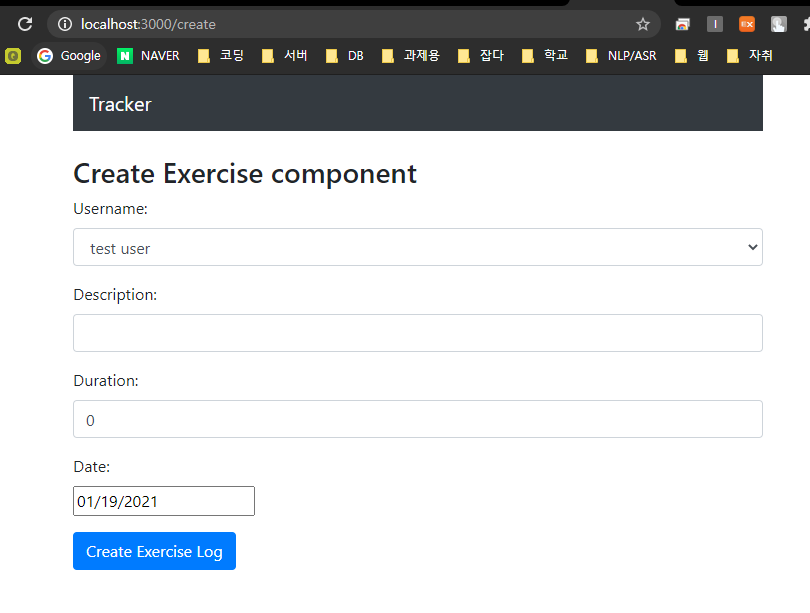
component/create-exercise.component.js
import React, {Component} from 'react';

//module
import DatePicker from 'react-datepicker';
import "react-datepicker/dist/react-datepicker.css";

export default class CreateExercise extends Component {

    //setting initial state of the component
    constructor(props) {
        super(props);

        //this가 함수들 안에서 정상적으로 작동할 수 있도록, 함수를 this에 bind 해주어야 한다.
        this.onChangeUsername = this
            .onChangeUsername
            .bind(this);
        this.onChangeDescription = this
            .onChangeDescription
            .bind(this);
        this.onChangeDuration = this
            .onChangeDuration
            .bind(this);
        this.onChangeDate = this
            .onChangeDate
            .bind(this);
        this.onSubmit = this
            .onSubmit
            .bind(this);

        this.state = {
            username: '',
            description: '',
            duration: 0,
            date: new Date(),
            users: []
        }
    }

    // people filling out the form must select the user associated with the exercise
    // from a drop down list. 결국, mongoDB에서 바로 user list가 불러져야 하지만 일단은.. 하드코딩으로
    // 대체한다. 이 함수는 React life cycle의 일부이며 component가 연결된 후 바로 불러지게 된다.
    componentDidMount() {
        this.setState({users: ['test user'], username: 'test user'});
    }

    //add methods in order to update the state properties
    onChangeUsername(e) {
        this.setState({username: e.target.value});
    }
    onChangeDescription(e) {
        this.setState({description: e.target.value});
    }
    onChangeDuration(e) {
        this.setState({duration: e.target.value});
    }
    //조금 다른 건, 나중에 date picker library를 추가해줄 예정이라 그럼 event 변수 자리에 date가 온 것에 유의
    onChangeDate(date) {
        this.setState({date: date});
    }

    //add this to handle the submit event of the form
    onSubmit(e) {

        //default HTML form이 전송되는 것을 방지.
        e.preventDefault();

        const exercise = {
            username: this.state.username,
            description: this.state.description,
            duration: this.state.duration,
            date: this.state.date
        };

        console.log(exercise);

        //홈으로 돌아가는 기능
        window.location = '/';
    }

    render() {
        return (
            <div>
                <h3>Create Exercise component</h3>
                <form onSubmit={this.onSubmit}>
                    <div className="form-group">
                        <label>Username:
                        </label>
                        {/*
						어휴 주석 쓰기 힘드네..
						아래 select가 user list를 drop down해주는 역할을 함.
						*/
                        }
                        <select
                            ref="userInput"
                            required="required"
                            className="form-control"
                            value={this.state.username}
                            onChange={this.onChangeUsername}>
                            {
                                this
                                    .state
                                    .users
                                    .map(function (user) {
                                        return <option key={user} value={user}>{user}
                                        </option>;
                                    })
                            }
                        </select>
                    </div>
                    <div className="form-group">
                        <label>Description:
                        </label>
                        <input
                            type="text"
                            required="required"
                            className="form-control"
                            value={this.state.description}
                            onChange={this.onChangeDescription}/>
                    </div>
                    <div className="form-group">
                        <label>Duration:
                        </label>
                        <input
                            type="text"
                            className="form-control"
                            value={this.state.duration}
                            onChange={this.onChangeDuration}/>
                    </div>
                    <div className="form-group">
                        <label>Date:
                        </label>
                        <div>
                            <DatePicker selected={this.state.date} onChange={this.onChangeDate}/>
                        </div>
                    </div>

                    <div className="form-group">
                        <input type="submit" value="Create Exercise Log" className="btn btn-primary"/>
                    </div>
                </form>
            </div>
        )
    }
}
코드 해설을 적을까 고민했다가, 그냥 달아준 주석이 생각나서 가져다 붙여버렸다.
오늘 한 것만 정리해보자면,
지난번에 했던 backend 구조에 이어 front, from component를 만들어 준 것으로 이해하면 될 듯 하다.
기본적으로 php 웹 사이트를 구동하며 ajax를 만진 것을 생각하면서 개념을 잡아가려고 하였으나..
역시 다른 구조라는 것은 확실히 느껴지는 듯 하다.